You recorded a podcast with three cameras and two microphones. Now you have an hour of footage per angle and one job: show whoever is talking. Doing that by hand means watching the whole episode, picking an angle for every turn, and making a cut each time. It's not hard, but it's an afternoon you'd rather not spend.
Here's how a multi-camera podcast edit works in Premiere Pro and DaVinci Resolve, and where you can save the most time.
Get the cameras in sync first
Nothing else works until every camera and mic line up. If they're even a few frames apart, the cuts look wrong and lips don't match voices.
Three things usually line clips up: a clap at the start, matching timecode, or the audio waveform. Waveform is the one I'd use for podcasts, because every camera records the room's sound, so there's something to match. If you have separate mic recorders, make sure at least a little room sound reaches the cameras too.
Sync clips in Anvil Panel does the waveform sync in both editors, and both editors can do it by hand too. For the rest of this post, assume everything is already in sync.
The usual way: a multicam clip
In Premiere Pro
Adobe's help pages describe the method. Import the clips, select them in the Project panel, then choose Clip > Create Multi-Camera Source Sequence. In the dialog you pick how the angles are synchronized. Adobe lists in and out points, timecode, audio and clip markers as the options. Audio is the one that suits clips that share a sound source, such as a clapboard or a voiceover.
Premiere then makes a source sequence, and you right-click it in the Processed clips folder and choose New Sequence from Clip to get the sequence you actually edit in. From there you switch angles as the clip plays, and you can change any of those cuts afterwards. Adobe's article on creating and editing multi-camera sequences has the full workflow.
In DaVinci Resolve
Blackmagic Design describes two routes. The Edit page has a full multicam interface for projects with many cameras, with sync by audio waveform, timecode or in and out points, and keyboard and mouse controls for cutting and switching. You can also step into a multicam clip to adjust angles one at a time.
The Cut page works differently. You lay down a base edit first, then add cutaways. Its sync bin shows every clip that lines up with the playhead, and the Resolve 20 new features guide adds a live paint mode where you drag in the image to paint the angle onto the timeline. I'm leaving out exact menu names here because they changed between versions, so check the manual for the version you run on Blackmagic Design's site.
Where the time actually goes
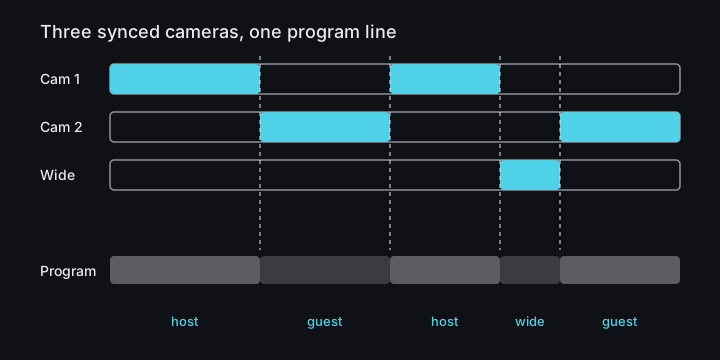
Building the multicam clip takes minutes. The slow part is the cutting pass. You play the episode live, pressing a key at every change of speaker, then go back and fix the places you were late. On a long conversation with quick back and forth, you'll fix a lot of them.
A few habits make that pass shorter:
- Do the cutting pass at normal speed with your eyes on the picture, and fix mistakes on a second pass rather than stopping every time.
- Don't cut to the listener on every "yeah" or "mm-hm". Stay on the speaker unless the reaction is the point.
- Cut slightly before a person starts talking, not after. The eye moves to the speaker a beat before the voice, so a late cut feels wrong.
- Use the wide shot as your safe angle. When you're unsure, go wide.
Cleaning up dead air before you switch cameras makes the whole pass shorter. See how to remove silence from a talking-head video for that step.
Cutting to the speaker without a multicam clip
You can skip the multicam clip entirely. Put the camera clips on separate tracks, in sync, with the mic clips alongside. Then cut every camera at the same points and disable the angles you don't want to see at each moment. The result is plain clips and cuts, so you can change any decision by turning a piece back on. It's more manual work than a multicam clip, which is why people reach for one.
How Anvil Panel handles it
Podcast cut in Anvil Panel does that pass for you, and it doesn't need a multicam sequence. You put the camera and mic clips on the timeline in sync, select them (in Resolve, set In and Out around the conversation), and press the button. The cameras are cut at every switch, and the pieces it did not choose are disabled, not deleted.
Each mic is measured against its own noise floor. That matters for podcasts, because two microphones at different gains, or one voice leaking into the other mic, are what usually fool simple level-based switching. In testing, it switched within half a second of scripted turns.
Because the result is ordinary cuts and disabled clips, you can overrule it. If it picked the wrong angle for a moment, re-enable the piece you want and that camera replaces the choice on that stretch. Everything is undoable, and nothing is locked inside the panel. It works in Premiere Pro 2020 or later and in DaVinci Resolve Studio 18 or later.
If your cameras aren't in sync yet, Sync clips in the same panel lines them up first. After that, Silence cut takes out the long pauses.
You don't need to buy anything to finish this job. The multicam workflows above are what editors have used for years, and they work. The tool is for the editor who does this every week and wants the first pass done before they sit down.
A routine I'd use
- Sync all cameras and mics, and check the sync at the start and at the end of the recording. If it drifts, fix that before anything else.
- Cut out the false starts and the parts nobody needs.
- Do the speaker pass, by hand with a multicam clip or with Podcast cut.
- Watch the whole thing once and fix the awkward switches, especially fast back and forth where a camera flicks over for a half second.
- Add a wide shot or a cutaway to cover any jumps in the middle of a person's answer.
Step four is where the polish comes from. A first pass, whoever makes it, is a draft. The edits that feel best are the ones where you never notice a cut, because the picture was on the right face just before you wanted to look at it.
If you're also trimming filler words from the audio, do that before the camera pass, since removing a word changes where the speaker changes. I wrote about it in how to remove um and uh from interviews.