You record a good interview, play it back, and every third sentence has an "um" in it. The person sounds fine in the room. On a timeline, with headphones on, the fillers are all you hear. Cutting them out by hand is slow, and the sound often comes out worse than the original, because every cut leaves a join you now have to make invisible.
Here's how I handle it in Premiere Pro and DaVinci Resolve, by hand first, then with a tool.
Decide which fillers to cut
Not every filler needs to go. An "um" in the middle of a thought is usually safe to remove. A pause before a hard answer, or a "well" that shows the person is picking their words, can be part of the character. If you take out everything, the speaker starts to sound like a robot reading a script.
My rule: cut the ones that interrupt the sentence, keep the ones that carry meaning. Words like "like" and "you know" are the risky ones, since they're also real words. Listen before you delete.
Method 1: in Premiere Pro, with the transcript
Premiere Pro has Text-Based Editing, and it can find filler words in the transcript for you. Adobe's help pages describe the steps:
- Transcribe the sequence so the Transcript panel has text to work with.
- In the Transcript panel, select the filter icon and choose Filler words.
- Use Delete to remove a single instance, or Delete all to remove every one that was found.
Deleting text from the transcript removes the matching part of the sequence, and Premiere applies a ripple edit so the gap closes. Adobe says to use clear dialogue recordings with little background noise for best results, and that matches what I see: the messier the audio, the more fillers get missed.
Don't hit Delete all without looking. Click through a few instances first and listen to the join. If the speaker runs words together, a cut that's correct on paper can sound clipped.
Adobe's guide to Text-Based Editing covers the workspace and the transcript options in full.
Method 2: in DaVinci Resolve, with the Transcription window
Resolve 19 added text-based editing, where you transcribe the clips and then cut, select and paste text in the Transcription window. Those changes carry over to the timeline. Blackmagic Design describes this in its Resolve 19 new features guide.
I haven't found anything in Blackmagic's documentation that says Resolve finds filler words on its own, so in Resolve this one is manual: read the transcript, select each filler and cut it. A cut sentence leaves a silence marker in the transcript, and you select that marker and delete it to close the hole on the timeline.
For the pauses around the fillers, newer versions of Resolve also have a Ripple Delete Silence command, which Blackmagic added in Resolve 20.2. It works on a selected clip with a threshold in dB, padding and a minimum silence length. I cover the pauses side of this in how to remove silence from a talking-head video.
Make the joins sound natural
Cutting is the easy half. The cut has to sound like nothing happened.
- Cut on the breath, not through it. If you slice right at the start of the next word, the first consonant gets clipped.
- Leave a few frames of room tone. A gap that's perfectly silent sounds like an edit.
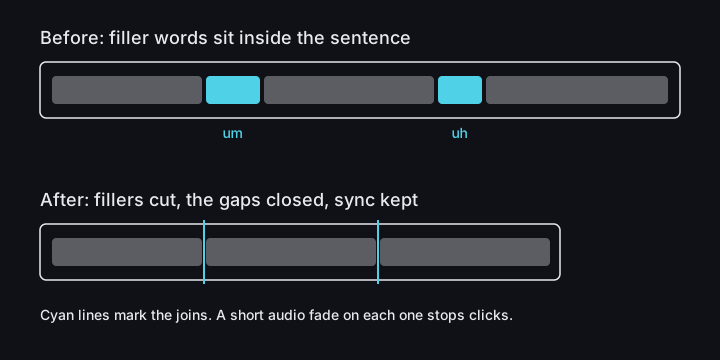
- Put a very short audio fade on each join so the waveform doesn't jump.
- Watch the picture. A cut inside a continuous shot makes the speaker's head or hands jump. Cover those with a cutaway, or leave the filler in.
Where Anvil Panel comes in
If you do this on every interview, the manual route gets old. Filler-word cut in Anvil Panel listens to the clips you select and finds the ums, uhs, filler phrases and repeated words. You pick what to look for, then choose Cut them or Mark only. Each filler comes out of every track together, so sync holds, and each join gets a short audio fade.
Speech recognition runs on your own computer, so the footage isn't uploaded. "Like", "you know" and "I mean" are only picked when they're set off by a pause or a comma, so real sentences are left alone. In a repeat such as "the the", only the first one goes. In Premiere Pro you can untick any word before cutting, and in both editors one Undo puts the cuts back. It works in DaVinci Resolve Studio 18 or later, and it's one of the twenty tools in the panel.
On a talking-head or podcast edit I'd run Silence cut first and Filler-word cut second. If you'd rather review before anything is cut, use Mark only and go through the markers.
You don't need to buy anything to get this done. The transcript methods above work, and I used them for a long time. The tool just does the same job on a whole interview in one pass, which matters when the interview runs an hour.
The order I work in
Whatever method you use, the order matters more than the tool. First cut the content: drop the bad takes, the tangents and the questions you don't need. Then take out the long dead air. Only then go after the fillers, because by that point you're hunting through a much shorter timeline and half of them are already gone.
Then play the whole thing once without stopping, with your eyes closed if the picture distracts you. You're listening for any join that makes you flinch. Fix those by hand, give the rest a pass, and move on. Chasing every last "um" is how a ten-minute edit turns into an afternoon.
If the interview is going on social media as well, do the filler pass before you pull the short clips out of it, so you only do it once. J-cuts and L-cuts are the next thing to look at, since they hide the picture jumps that filler cuts sometimes leave behind.